Chicken Parm Heaven! (And those great spicy chocolate cupcakes!)

4 Aug

Before I give you the recipes you want I have to take a moment to brag on this restaurant I went to this past weekend. It’s called Thrive in downtown Atlanta. If you’ve never been and you live nearby, it’s worth the trip and the money. I had amazing chicken and potato pot stickers, pork loin in sweet chili sauce with shiitake mushrooms and a delicious molten chocolate cake. Unfortunately for you the pot stickers and cake were eaten too quickly for me to snap a picture, but here is a shot of the incredible, cooked to perfection pork loin.

Seriously. Best thing I’ve ever eaten. Maybe.

Anyway, now on to this great stuffed chicken parmesan that I made when I got home. =]
You need:
boneless, skinless chicken breasts
thin-sliced deli ham
1 cup bread crumbs
1 cup parmesan cheese
angel hair/vermicelli pasta
half stick (ish) butter

Now take your chicken breasts and slice them longways, but don’t go all the way to the other side. You should be able to open it like you would open a book. Stuff a few slices of ham in the opening. Now take your parmesan and breadcrumbs and mix them together pretty thoroughly. Coat both sides of the chicken breast evenly and place in a greased baking pan. Bake at 375 for about 45 minutes.

The pasta takes about 15 minutes to finish, so I started about ten minutes before the chicken came out of the oven to give the meat a little time to cool. You’ll want to cook your pasta the same as you always would and in a small saucepan place your butter on medium heat. As soon as it is all melted you will want to keep a constant eye on it. When it starts to turn golden brown (trust me you’ll know!) it is done! So strain your noodles and pour that butter over top, toss it to give all of those noodles a good coating of butter and serve beneath your delicious parmesan chicken!

The result…

Also made by me recently was a really awesome quiche. This quiche was a corn, potato and bacon quiche, and let me tell you it was absolutely scrumptious!

You’ll need…

pie crust (I used a frozen one)
1/2 cup chopped, cooked bacon
3/4 cup small cubes of potato, or you can do them hashbrown style
1/2 – 3/4 cup corn (frozen will work fine, but we used amazing corn from the cob)
4 eggs
2 cups milk
salt and pepper to taste
2 1/2 cups grated monterey jack cheese

You’ll need to pre-cook your corn, potato and bacon. (I just did them all in a pan on the stove, nothing fancy.) Then mix together the eggs and milk and a cup of cheese, making sure your eggs are thoroughly beaten. Season with salt and pepper. Now take your bacon and corn and potato and spread it evenly over the bottom of your prepared pie shell. Pour in the egg/milk mixture and sprinkle your remaining cheese over top. (I use a lot of cheese because, yes, I love cheese. You can always cut this down.) Then pop it in the oven at 350 for about thirty minutes or until that cheese on top turns a nice golden brown.

Now for dessert! The spicy chocolate cupcake I mentioned in a previous post! These truly came out as one of the most delicious things I have ever taste. The chocolate and the spices balanced each other out so nicely. Do not be afraid of this cupcake! It’s really not that spicy! I made them with a chocolate ganache topping as well as a small dollop of chocolate cinnamon frosting, but you can always opt out of either one.

You’ll need…

CAKE
1 chocolate fudge cake mix + necessary ingredients
1 1/2 tsp cayenne pepper
2 tsp cinnamon

GANACHE
1/2 cup milk
1 tsp vanilla
sprinkling of cayenne, cinnamon
about 2 cups melting chocolate (or chocolate chips!)

FROSTING
1/2 cup shortening
2 cups confectioner’s sugar
cocoa powder to taste (I used about two tablespoons)
cinnamon to taste
splash of milk

For the cake all you do is prepare it EXACTLY as you are instructed on the back of the box. No fancy pants substitutions or anything, just fix it. The only thing you are adding is the spices! Now. I will tell you now that it may sound like a lot to you, but all of that strong flavor really fades out when you bake it. So don’t be daunted and don’t you DARE cut the measurements. You won’t taste anything. Bake according to the box, of course.

Now the ganache. Sounds like it might be difficult, no? Guess again. It was easy. And totally delicious. Not going to lie, I ate like four tablespoons of it straight out of the saucepan.

Pour your milk into the saucepan and bring it to a gentle boil.
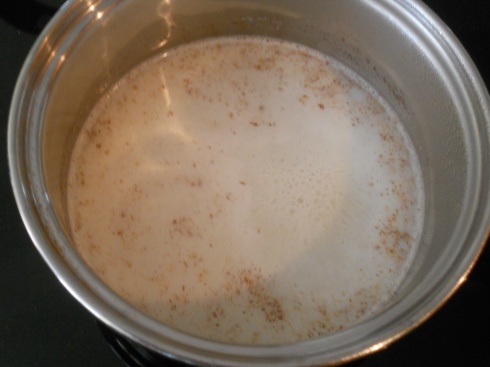
As soon as it starts to boil add in your chocolate and the vanilla. Once that chocolate just begins to melt bring the heat down to a “melt” setting (around 3 or 4 on my stove). Once it all begins to melt down you’ll add your spices to taste.

Once again, that spicy flavor doesn’t come through nearly as strong as you think it will! So be sure to taste test and adjust accordingly! BE SURE that your cupcakes are cooled before you make this ganache, otherwise the heat from the cake and from the melted chocolate makes for a runny mess! So how do you know the ganache is done? It’s done when there are no lumps in the chocolate and you are left with a saucepan full of thick, smooth, rich deliciousness. Take a regular kitchen tablespoon and spoon a bit of it over the surface of the cooled cupcake. I layered on a good bit of it because I thought it was so yummy, but it’s up to you. If you choose to go with a thinner layer you may want to cut back a tiny bit on the measurements. Let the ganache cool in the refrigerator!

Once it is cool you can start your buttercream. Cream together the butter and a splash of vanilla and that small bit of milk. Gradually add in your sugar and then go for the cocoa and the cinnamon. This frosting was so excellent. I made a very small batch of it as I only did a pretty small topping of it over that ganache. Seriously these were amazing. Make them. Eat them. Tell me how much you love them.
Here they are without ganache yet. Poor, naked cupcakes.
And with the ganache. Num num num.

One final thing that’s the easiest thing you could ever make. Muffins in a mug! I made double chocolate muffin in a mug, but the flavor is easy to experiment with. My recipe is adapted from wikiHow.

1 egg
4 tbsp flour
4 tbsp sugar
3 tbsp milk
3 tbsp vegetable oil
2 tbsp cocoa
handful of chocolate chips

Mix all of the ingredients very thoroughly in a small bowl, pour into a mug and put in the microwave for 2 and a half to 3 minutes. Consume. Be happy!

I hope you have all thoroughly enjoyed this episode of Alice! in Cookingland.

The Moment You’ve All Been Waiting For–New recipes!!!

29 Jul

I know I know, it has been entirely too long since I’ve put up an actual post with an actual recipe. I am so sorry. So so sorry. Anywho, I’ll keep this intro short and sweet, since I have so many delicious new things for you to read about! But I just wanted to say thank you to anyone who is truly reading/following this blog. I never dreamed that I would have over 200 hits, so thank you thank you thank you, and I encourage you to leave me comments. I would love to get to know each and every one of you readers out there. =]

Recipe Numero Uno! The Tortilla Pizza, Take Two

Yes, I know it’s not a forreal recipe, but it was so so good. I blogged about this a while ago and it was even better the second time around. I prefer plain pizzas so I went with simple chicken and lots of cheese, while my parents piled on spinach, tomatoes, chicken, cheese and onions. If you want the “recipe” from earlier you can find it here!
Here’s what they looked like!

Recipe Numero Dos! Peach Almond Cake!

This idea came from a dream. I kid you not. I dreamed that I was baking a peach almond cake so I woke up and, you guessed it, baked a peach almond cake. As with most of my cakes the peach flavor didn’t come through quite as strong as I had hoped, but all in all it was a delicious cake.

CAKE
1 WHITE cake mix + necessary ingredients
2 peaches, pitted and cubed

ALMOND BUTTERCREAM
1 cup chortening
3-4 cups confectioners sugar
1/2 tsp vanilla extract
3 tsp almond extract ( or just to taste. I used a lot, since I really wanted a strong almond flavor, but it’s up to you.)
Splash of milk

A handful of finely chopped almonds (optional)

1. Puree your peaches. Add the peach puree with a little bit of water to your mix in place of the called-for water. Add in the rest of the ingredients the mix calls for, pop in the oven at 350 for about 26 minutes, give or take.
2. Mix shortening and about a half of the sugar, all of the extracts and the milk together until they are pretty well mixed.
3. Add in the rest of the sugar, beating slowly and getting progressively higher until you are beating on the highest setting.
4. Taste! My favorite part! If your almond extract has given the frosting a little bit of a bitter taste, you just haven’t used enough vanilla to balance it out, so go ahead and give it a little bit more vanilla, beat it in and taste again. Repeat until satisfied with the flavor.
5. Your buttercream should be light and fluffy, as well as delicious!
6. I did a two layer cake, spreading a bit of the frosting between the layers and then frosting the whole cake. Then I added finely chopped almonds on top for some pretty decoration.

The Final Recipe! Lemon Blueberry Birthday Cake

No intro needed but YUM. This was probably one of the prettiest cakes I’ve done and it was also really yummy.

CAKE
1 WHITE cake mix, necessary ingredients EXCEPT water
1 cup lemonade concentrate
1/4 cup lemon juice
Several handfuls blueberries
A few extra berries for decoration (optional)

FROSTING
1 standard container Cool Whip
2 standard containers lemon yogurt
3-4 cups confectioners sugar

Mix the cake mix as usual, replacing the water with the lemonade and lemon juice. This gives the cake a very strong, but not unbearable, lemon taste–balanced, of course, by the sweetness of the cake mix. Add in blueberries, according to how many you want in the cake. I used about four handfuls, but if you want more or less…well, you know what to do. Bake at 350 for about 27 minutes or so.

Now, I stepped out of my comfort zone with the frosting for this cake. I wanted to try something new and a little lighter for such a summery cake. Now, it wasn’t my favorite, but it was very easy to make and it got RAVE reviews. I kid you not, everyone absolutely loved it. (I thought it was a little too sweet for me.) All you do is empty the Cool Whip and the yogurt into a large bowl with about two cups of the sugar. Beat it on high (starting slowly, of course) until the sugar is well mixed in. Add in the rest, beat, and voila! Place it in the freezer for about an hour to let it thicken up a bit.

I must warn you, though this frosting makes for an absolutely gorgeous, smooth cake it is a little difficult to work with. With a standard buttercream it is easy to spread without making a mess. While making this cake I had frosting everywhere. Since it is a thinner frosting with less form and hold than buttercream it runs. Like a cheetah. As soon as I attempted to frost the sides of the cake it was dripping all over the counter. So what I did was poured most of the frosting on the top of the cake and let it drip down the sides. Once it looked like it was finished dripping and had set I took a frosting spatula and smoothed out the sides and the top. The result was stunning, but definitely a pain in the ass. I had quite a bit of extra frosting and plenty of it on the cake plate and the kitchen counter, so be sure to clean up that plate before you present it. (By the way, this was also a layered cake with frosting in the middle, though I played with the idea of blueberry jam in the middle. Your call.) Here’s what it looked like, with a few blueberries on top for pretty decoration!

Keep an eye out later today or tomorrow for the South of the Border cupcake. I am working on fine tuning the frosting RIGHT NOW!

Hello, Loyal Fans!

28 Jul

Just writing to say….

LEAVE ME COMMENTS!

AND I will be writing more shortly. Probably tomorrow. Don’t worry, I have plenty of delicious recipes for you.

I Know It’s Been a While…

24 Jul

…but I’ve been so busy!

Here’s a re-cap of all of the *insert very unladylike word here* that has happened to me since I last wrote.

Went to the doctor: mono for the third time
Went home: Nutella milkshake (read on!)
Worked, slept, worked, slept, slept, slept, slept.
Ate a lot of ice cream and hot tea.
Took my grandma to see my college.

And now I’m home! Tired as ever, of course, but feeling a little more motivated to do some real work in the kitchen instead of what pathetic excuses for nourishment I’ve managed to pull together…including but not limited to a Jamocha shake and curly fries at Arbys.

So earlier I mentioned a Nutella milkshake. If you haven’t picked up on it, I’m in love with Nutella. I pretty much think it is the food of the gods, and it is. So I made me a fantastic Nutella shake that was so chocolatey and rich you could die of happiness.

Vanilla bean ice cream + 2-3 tbsp Nutella + splash of milk + handful of chocolate chips + dash of chocolate syrup + blender = the most delicious frozen treat to ever walk the earth. So good.

Now if you’ll excuse me, I must go make something chocolatey and scrumptious to satisfy the aching in my sweet teeth. (Yeah, I have way more than just one sweet tooth. Don’t judge me.)

❤ Alice!

Some Photos For Your Viewing Pleasure

19 Jul

A few pictures of my previous creations. I don’t often photograph my food, since the people seeing it are usually the ones eating it! So in the future if I forget to take a picture and you would like to see one, just let me know!

What Does One Do On The Worst Day Ever? Eat!

19 Jul

So last night I was awoken by the sound of the house phone ringing–never a good sign. Lo and behold the alarm was going off at my mother’s bank (she’s the manager) and she was needed there immediately. As soon as I proceeded to fall back into an incredibly restless sleep it seemed it was time to wake up for work. I was tired and lethargic all morning and thus horribly upset with myself for being so lazy.

So I decided to get out for lunch, you know to get some air and some food. I pulled into Sonic for a bacon/egg/cheese toaster and a mocha java chiller (YUM!) and maybe fifteen minutes later when I went to turn on my car to return to my dreadful job…………….nothing. Nope. Nothing. The engine wouldn’t even turn over. What the hell. So my stepdad had to very embarrassingly come pick me up, drop my keys off at the Firestone shop and then take me back to work.

On the plus side, I got last week’s pay check. On the down side, it wasn’t as much as I thought it was going to be.

So I came home to one of these!

Oh, wow. Yum yum yum!

You can find the recipe here!

Blondes DO Have More Fun–Strawberry Margarita Cake

19 Jul

Once upon a time there was a young girl named Alice. She was born with no hair. But by the time she was two she had a lovely head of auburn curls that turned a rich chestnut hue as she grew up. Then when she turned eighteen she took all of her first paycheck, went to the salon and went blonde.

Now she’s having more fun–in the kitchen, in her life, unfortunately not in bed. And as a product of all this freshly discovered fun the Strawberry Margarita cake! Easy peasy, lime squeezy!

Cake
White Cake Mix + called for ingredients
1 carton strawberries
tequila! *insert catchy music here* (by the way, this is NOT an exact measurement. If I had to guess I would say that I used maybe 1/5 cup but it’s really kind of up to you)

Lime Buttercream Frosting
1/2 cup butter
1/2 cup shortening
3-4 cups confectioners sugar
a splash of tequila
lime juice to taste (I used a LOT of lime juice, as I wanted the lime to really pop, but it’s up to you)
a dash of salt

Mix cake mix, eggs and oil in a large bowl. INSTEAD of water use strawberry puree. I used an entire carton for a really berry-y flavor. Bake at 350 for 25ish minutes.

I poured all of the frosting ingredients in a large bowl at the same time and used an electric hand mixer, first on low and progressing higher in speed until it was nice and fluffy. I taste to make sure it has the right flavor, so if it’s not to your taste touch up whatever ingredient is lacking.

When I made the cake, I did two layers, spread a little of the buttercream between the two and then topped it with a little strawberry jam, then frosted the whole cake. It was amazing! Will be posting pictures soon!

Food Network and White Lasagna

15 Jul

The other night I made a really simple, totally delicious white lasagna with chicken and ham. Unfortunately it came out kind of runny, so the next time I make it I’ll probably be using a jar of alfredo sauce instead of making my own variation. Here it is!

1 box lasagna noodles (thought this would be delightful as a baked penne or rigatoni)
1 jar alfredo sauce
1 rotisserie chicken (or you can make your own if you want to be all fancy)
1 package thin sliced deli ham
1 1/2 bags mozerella cheese, shredded

Slice up your ham into little pieces (I used about half a package) and shred about half of your chicken, unless you want more. The measurements of the meat are really up to you. Layer your lasagna noodles (cooked!) in a pan, sprinkle in a healthy helping of cheese and a good amount of alfredo, topped with some chicken and ham. Repeat the layering process, ending with CHEESE on top. Pop in the oven at 400 covered with aluminum foil for about 30 minutes, then bake uncovered for about ten minutes.

Let cool for about ten minutes, enjoy!

Perfect Picnic Presents–Peachy Keen Cupcakes

15 Jul

Little known fact about me: I spent the first six years of my life in a little town in Florida, which of course sparked my profound love of summertime! We had citrus trees in the backyard and a pool that got much use. It was wonderful. Then we moved and I was introduced to Monsieur Winter, my least favorite, dreaded, despicable, horrible season. Not to dwell on that, though. So, this little summery delight was, in fact, inspired by my love of summer and the fruits that summer brings–Peaches! This is a marvelously simple recipe for a peach preserve cake topped with a lightly peachy buttercream frosting.

Cake
WHITE cake mix, not vanilla because the peach flavor will not be noticeable
About 1/2 cup peach preserves

Peach Buttercream Frosting
3 to 3 1/2 cups confectioners sugar
1/4 cup butter
3/4 cup shortening
1/2 tsp vanilla
1/2 tsp almond extract
2 peaches, pureed

For the cake, you’ll want to prepare it according to the box. (Nifty tip: if you run out of oil, like I did this morning, you can always just melt shortening! But, be careful, it bubbles up very rapidly.) Once you’ve whisked it all together and such, pour your peach preserves into a small saucepan with just a splash of water and bring it to a low boil. AS SOON as it begins to bubble, bring the heat to a low temperature and stir occasionally until you have a sort of thick syrup with peachy chunks floating around. Strain the syrup into the batter and whisk it in. Now, what I did was sort of mash up the peach chunks into a really thick kind of paste and then whisked that in as well, but that part is up to you. It gave the cake a little bit of texture and a stronger peachy flavor.

Pop them in the oven at 350 for 15-17 minutes. Since you’ve added in the extra moisture of the preserves it will take a little bit longer then what it tells you on the box. Mine came out perfectly at around 18 or 19 minutes, so just keep an eye on them and pull them out when they just start to get golden-brown on the tops.

Now you’ll want to prepare your buttercream. Cream the butter and the shortening with about half of the sugar, the vanilla and the almond extract. When it starts to get nice and creamy, just add in the rest of your ingredients, including the peach puree. Once it’s all nicely blended and powdered sugar isn’t flying everywhere, go ahead and beat it on a higher speed until it’s fluffy and delicious. I, of course, like to taste test my frosting, so go ahead and sample it. If you want a peachier flavor, go ahead and add in some more puree, or for a little kick, perhaps a splash of peach schnapps?

As soon as the cupcakes cool pile on this scrumptious frosting and pack a picnic!

Wake Up in the Morning Feeling Like…A Hot Mess

15 Jul

11:05 AM — Breakfast?
After rolling out of bed and spending an incredibly twenty minutes looking out the window at a baby bunny in the backyard, I finally managed to meander into the kitchen. On the counter? About a thousand home-grown tomatoes. In the refrigerator? Ketchup, mustard, relish, pickles and one carton of yogurt. In the pantry? A dozen boxes of cake mix and a box of stale Count Chocula. So I did some more refrigerator exploring and came up with…a slice of leftover BBQ pizza.

Breakfast of champions! Which reminds me of the best leftovers/dorm room food recipe that really isn’t a recipe at all. It goes a little something like this.

Step 1: Look around in your fridge and pantry and freezer and such. Be sure to return from your adventure with some tortillas, some spaghetti sauce and shredded cheese.
Step 2: Put tortillas in the oven on BROIL for about a minute and a half to two minutes.
Step 3: Take them out, flip them over.
Step 4: Pile on your favorite or just convenient pizza ingredients. (I’m partial to leftover chicken, mozerella cheese, a little basil, some corn and a little bacon. Maybe some BBQ sauce.)
Step 5: Pop back in the oven until cheese is melty and delicious.
Step 6: EAAAAT!